


Pruning Guide
10 REASONS TO PRUNE
1) Pruning maintains tree size within the orchard plot.
2) Pruning allows sun and air into the tree.
3) Pruning allows foliage to dry and, thus, reduces disease pressure.
4) Pruning allows more apples to set throughout the canopy.
5) Pruning allows sprays to penetrate the tree and be more effective.
6) Pruning makes bigger, tastier and better colored apples.
7) Better colored apples have more pigment (more anti-oxidants). Thus, pruning makes for more nutritious apples.
8) Pruning revitalizes (renews) the tree’s wood to keep it young and productive.
9) Pruning reduces wind resistance and likelihood of blowing over.
10) Pruning makes for stronger flowers, less subject by a degree or so to frost injury or frost kill.
WHY PRUNE?
Pruning is essential in a commercial orchard for the following reasons:
Pruning maintains the tree within its allotted space in the row and maintains adequate distance between the rows allowing equipment to move through.
Pruning opens up the canopy of foliage to allow light and air throughout the tree.
An open canopy allows air to move more freely throughout the tree. The tree then is less prone to fungal diseases such as apple scab, sooty blotch, fly speck and summer rots because the foliage dries out more quickly.
An open canopy also means less wind resistance and less likelihood of a tree blowing over during heavy wind.
An open canopy allows spray materials to move throughout the tree structure allowing less spray materials to do a better job.
Pruning to keep the upper part of the tree increasingly smaller in circumference as one moves up the trunk achieves a cone shape, the most efficient shape a tree can have to intercept light. Good light interception means more apples. Apples only can grow where there is adequate light intensity.
Pruning also thins the number of apples on the tree. In general, there is an inverse relationship between the number of apples on a tree and the average size of each apple. PRUNING MAKES FOR BIGGER AND BETTER APPLES! Reducing the number of fruits per tree in such a way as to increase the ratio of leaves to fruit, insures higher fruit quality as more photosynthates (sugars being manufactured in the leaves) go to those remaining apples. The more sugars, the more tasty the apple!
Pruning leads to better fruit color and finish. Apples color best under strong light. The best color (pigmentation) occurs when sunny days are followed by cool nights.
The pigments that give apples their color such as anthocyanins which make red apples red, are antioxidants, cancer fighting phytonutrients. Better color means BETTER FOR YOU!
Pruning stimulates new growth. Removing large older wood in the top of the tree encourages new wood to grow. The best apples grow on two to four year old wood. The old adage in the fruit industry is …A tree is only as old as the wood in it!
Pruning makes for larger, stronger flowers able to withstand a degree or so colder temperatures during a frost, which translates to bigger fruit.
There you have it! Now you know why we prune!
 People always ask us what we do over the winter. While we have a long list of jobs we
couldn’t get to over the summer, we do have 6500 trees to prune, and that keeps us pretty
busy. Pruning helps the tree in a number of ways. It opens up the canopy so that sunlight
can reach all leaves and all apples. Apples are like people, their skin doesn’t color
unless it’s in the sun. Pruning also cuts down the number of buds on the tree. Buds become
flowers which become apples. A tree can only support so many apples so if you want them
to be big and sweet, you’ll need to prune. Pruning also keeps a tree healthy and vigorous.
Removing limbs that are overgrown makes them less vulnerable to being broken by a storm. A clean cut
is easy to recover from but splits can be fatal. Pruning also gives a tree new life. As the
old adage goes, “A tree is only as old as the wood in it.” The best apples grow on 2-4 year
old wood so regular pruning keeps your fruit quality high.
People always ask us what we do over the winter. While we have a long list of jobs we
couldn’t get to over the summer, we do have 6500 trees to prune, and that keeps us pretty
busy. Pruning helps the tree in a number of ways. It opens up the canopy so that sunlight
can reach all leaves and all apples. Apples are like people, their skin doesn’t color
unless it’s in the sun. Pruning also cuts down the number of buds on the tree. Buds become
flowers which become apples. A tree can only support so many apples so if you want them
to be big and sweet, you’ll need to prune. Pruning also keeps a tree healthy and vigorous.
Removing limbs that are overgrown makes them less vulnerable to being broken by a storm. A clean cut
is easy to recover from but splits can be fatal. Pruning also gives a tree new life. As the
old adage goes, “A tree is only as old as the wood in it.” The best apples grow on 2-4 year
old wood so regular pruning keeps your fruit quality high.
 There are a few things we should mention before we get
started. First, this guide is for apple trees. These rules
don’t necessarily apply to other types of trees or shrubs.
Second, while the tree in the photos has leaves, (its just
for looks) its best to prune trees while they are dormant.
Just be sure that the weather won’t dip below 17 for a week
or so after you finish so that the tree has time to recover.
There are a few things we should mention before we get
started. First, this guide is for apple trees. These rules
don’t necessarily apply to other types of trees or shrubs.
Second, while the tree in the photos has leaves, (its just
for looks) its best to prune trees while they are dormant.
Just be sure that the weather won’t dip below 17 for a week
or so after you finish so that the tree has time to recover.
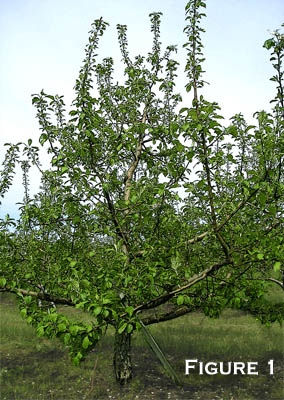
Take a look at Figure 1 to get a sense of what an apple tree looks like before it is pruned.
Notice how many limbs are moving vertically and how difficult it would be for sunlight to get
to all areas of the tree, especially the inside. There are four things you want to keep in mind
when you are getting started. You want the tree to have a conic shape,
wide at the bottom and narrow up top. (Figure 8 shows the finished tree) You want to have
two tiers of main branches (what we call wagon wheels) one at 32 inches and a second at 64 inches.
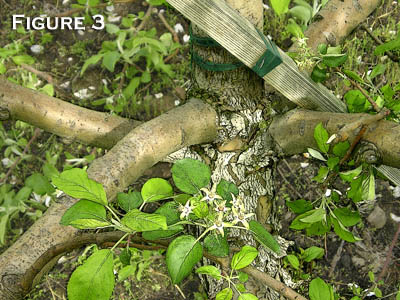
Make sure the branches of your wagon wheel
(Figure 3) are no more than ˝-2/3 the diameter of the trunk. Once they get larger than that they
dominate the tree and upset its balance. If you have a branch that is too large in diameter saw it off Ľ of
an inch from the trunk. There are buds in this quarter inch that will form your new branch. Finally, as you
prune remember that you want every branch and leaf to have a clear path to the sun.
 If you are planting trees in a row, its best to
align them North to South. This allows the
trees to absorb the sunlight from the East and
West. If you are starting with a brand new
tree that has not established branches, called
a whip, clip it at 32 inches once it is planted. It should form small branches near the top.
Identify which is the strongest and most vigorous. This will be your leader and grow up to
form the trunk of the tree. Then select four others and use clothespins to position them in
the four cardinal directions. If you are working with a tree that has already been
established, find the three or four best limbs around the bottom middle of the tree. Make
sure they are spaced out over the four cardinal directions. If two branches are at the
correct height but are growing too close together, use a spreader (a piece of wood notched at both ends) to
direct one away from the other. Then saw out the branches that crowd the tree. Do the
same for your second wagon wheel at 64 inches. Be sure that the branches of the second
wagon wheel are thinner and shorter than those of the first so that they do not shade
the lower tier.
If you are planting trees in a row, its best to
align them North to South. This allows the
trees to absorb the sunlight from the East and
West. If you are starting with a brand new
tree that has not established branches, called
a whip, clip it at 32 inches once it is planted. It should form small branches near the top.
Identify which is the strongest and most vigorous. This will be your leader and grow up to
form the trunk of the tree. Then select four others and use clothespins to position them in
the four cardinal directions. If you are working with a tree that has already been
established, find the three or four best limbs around the bottom middle of the tree. Make
sure they are spaced out over the four cardinal directions. If two branches are at the
correct height but are growing too close together, use a spreader (a piece of wood notched at both ends) to
direct one away from the other. Then saw out the branches that crowd the tree. Do the
same for your second wagon wheel at 64 inches. Be sure that the branches of the second
wagon wheel are thinner and shorter than those of the first so that they do not shade
the lower tier.
 Once you have taken care of your large branches you can move on to the limbs that grow from them. Before
you make a cut you need to understand the difference between heading cuts and thinning cuts. A heading cut
clips a vigorous new shoot in the middle of the shoot, as you would do with a young tree when you clip it
at 32 inches. This vigorous shoot then produces a number of new shoots at the cut, called bottle brushing.
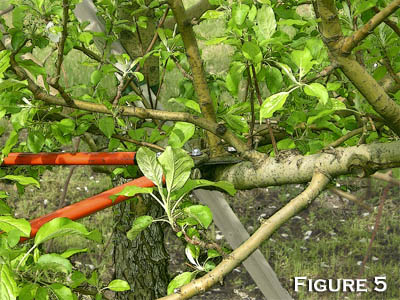
Bottle brushing makes for a very messy tree so we want to be careful to avoid it. Thinning cuts clip a limb
down at its base, (Figure 5) getting rid of as much of the limb as possible. This keeps it from branching out.
Once you have taken care of your large branches you can move on to the limbs that grow from them. Before
you make a cut you need to understand the difference between heading cuts and thinning cuts. A heading cut
clips a vigorous new shoot in the middle of the shoot, as you would do with a young tree when you clip it
at 32 inches. This vigorous shoot then produces a number of new shoots at the cut, called bottle brushing.
Bottle brushing makes for a very messy tree so we want to be careful to avoid it. Thinning cuts clip a limb
down at its base, (Figure 5) getting rid of as much of the limb as possible. This keeps it from branching out.
There are a few rules to guide us as we begin clipping the limbs. The first and easiest rule is to eliminate
any limb that is going straight up unless you can use a spreader. If you take a look at our ‘before’ picture
of the tree (Figure 1) it seems like everything is shooting up in the air. All of these vertical limbs block
sunlight. Let’s look at an example. The main branch in Figure 5 has a shoot growing vertically out of the top
of the wood. Because we have plenty other limbs around we will clip it. If there were no other branches around
that vertical shoot we would leave it to avoid what we call “blind wood.” Blind wood is a long stretch of
branch with no limbs on it. The limbs bear the buds and we want to maximize the number of buds we have while
spreading them
 out evenly over the tree. In that case we would use a spreader to direct the shoot
down and out to the side.
out evenly over the tree. In that case we would use a spreader to direct the shoot
down and out to the side.
The second rule follows in line with the first, eliminate any limb that is headed down or growing underneath
something larger, unless you will be left with blind wood. The reasoning is the same. A limb that grows
underneath others will be shaded and won’t get enough light to produce good apples. If a limb is going
down but is the only limb for 10 or more inches, use a spreader to make it horizontal and avoid blind wood.
The third rule is to eliminate any limb that crosses over other limbs or that grows back into the tree,
again because it creates shade. If you follow these three rules you should eliminate 90% of the limbs necessary
to complete pruning. Trees pruned following these rules will produce wonderfully provided they are thinned and
protected from disease and weather. Thinning is the process of removing apple blossoms to leave only the
strongest ones to produce apples. Apple
 blossoms grow in groups of five, but five apples bunched together
don’t have enough room to grow. By pulling four of the blossoms and leaving the largest, called the King
Blossom, we leave one apple with enough space and food to grow large and sweet.
blossoms grow in groups of five, but five apples bunched together
don’t have enough room to grow. By pulling four of the blossoms and leaving the largest, called the King
Blossom, we leave one apple with enough space and food to grow large and sweet.
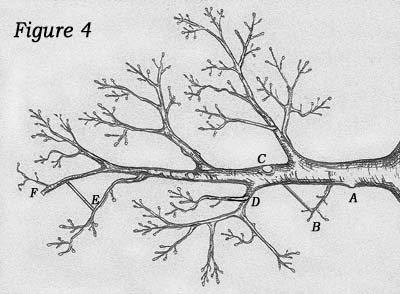
Figure 4 gives us a top view of an ideal branch. All of the limbs grow out and away from the sides of the branch
and are spaced evenly so that they do not shade each other. At point A we see where a limb has been pruned that
was growing too close to the trunk. It is good to keep a space of about 10 inches from the trunk to allow light
in. We have left a small limb next to it (B) that was growing underneath the tree to keep from having blind wood.
The spreader will cause the limb to grow out to the side rather than underneath the branch. We have pruned a shoot
that was on top of the branch (C) to keep it from shading the other limbs. The limb at point D is growing on top
of another limb but it doesn’t create much shade because it is small and there is nothing under it so we have left
it. The limb at point E was growing too close to the main branch
 so we used a spreader to send it out to the side. We have pruned the main branch at point F to
keep it from getting too long and we have left a small shoot there
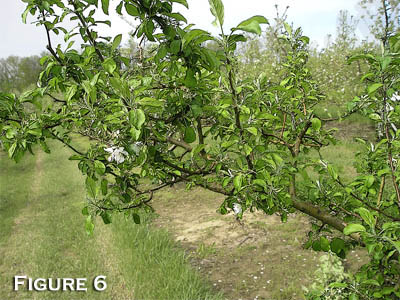
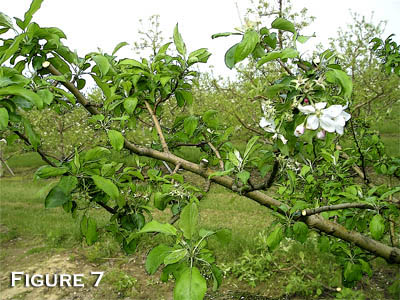
to keep a few more fruit buds. Compare Figures 6 and 7 to see how an actual branch looks before and after it
is pruned.
so we used a spreader to send it out to the side. We have pruned the main branch at point F to
keep it from getting too long and we have left a small shoot there
to keep a few more fruit buds. Compare Figures 6 and 7 to see how an actual branch looks before and after it
is pruned.
Figure 8 shows the finished tree. You can see the Christmas tree shape, wide at the bottom and narrow at the top.
You can also see how the wagon wheels create two flattened tiers that maximize exposure to sunlight. All of the vertical
branches have been eliminated and sunlight has a clear path all the way into the trunk. This particular tree had
begun to grow to the left near the top so we selected a new leader that would bring the top of the tree back to center.
All cuts
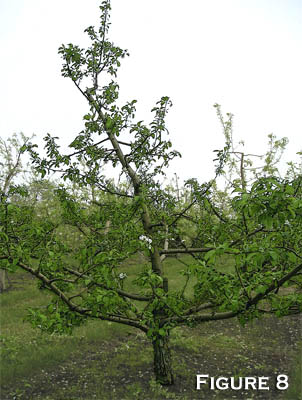 have been made at the very base of the limb to eliminate bottle brushing so there are no nubs left over
from pruning. We have left plenty of wood on the tree, but the key is keeping all parts of the tree in balance with
each other.
have been made at the very base of the limb to eliminate bottle brushing so there are no nubs left over
from pruning. We have left plenty of wood on the tree, but the key is keeping all parts of the tree in balance with
each other.
After this pruning becomes a fine art. Factors such as the vigor of the soil, the type of apple, the performance
of the tree the preceding year and a number of others can influence the way a master grower prunes a particular
tree. What is important for the home grower to remember is to create balance throughout the tree. The fattest
branches should always belong to the lower wagon wheel. Wood should get thinner as it moves up the tree or out
along the main branches to the tips. Limbs should be evenly spaced over the tree and spreaders should be used to
keep the branches as flat as possible, allowing sunlight to enter.
Pruning requires knowledge, but it can be a lot of fun and very rewarding. With time and experience you will
learn to recognize a well pruned tree and you will start to see your trees in a new way. If you have had apple
trees for years but have not pruned, they can be daunting because of their dense branches. But the satisfaction
of seeing larger, more colorful apples is hard to match. We wish you well as you make your way through
the art of pruning.

|
The Apple Works Orchard
County Road 250 West Trafalgar, IN 46181
(317) 878-9317
|
|
Back to Top
